

Documentation Index
Fetch the complete documentation index at: https://relevanceai-task-ops-changelog-update.mintlify.app/llms.txt
Use this file to discover all available pages before exploring further.
Rollout Status: Evals is rolling out progressively, starting with Enterprise customers. If you don’t see this feature in your account yet, reach out to your account manager to discuss access.
What you can do with Evals
Run tests
Build test sets with scenarios that simulate real user interactions, then attach Checks to score every conversation automatically.
Reuse Checks
Define evaluation criteria once in the Checks tab and attach them to scenarios, Monitor dashboards, or ad-hoc evaluations of completed tasks.
Monitor live tasks
Create Monitor dashboards that score live Agent tasks against your Checks, with sample-rate controls and per-Check trend charts over time.
Evals sections
The Evals area has five sections, shown in the left sidebar of the Evaluate tab:- Test — Create and manage test sets. Each test set holds scenarios that simulate users; running a scenario produces a conversation with your Agent that gets scored by attached Checks.
- Runs — Past evaluation run results. Browse average scores, tasks evaluated, progress status, credit spend, and creation date for every run.
- Checks — The reusable set of evaluation criteria. Create a Check once, then attach it to scenarios, to Monitor dashboards, or to one-off evaluations of completed tasks.
- Publish — Choose which test sets must pass before your Agent can be published. Set a minimum pass rate and optionally block publishing on failure.
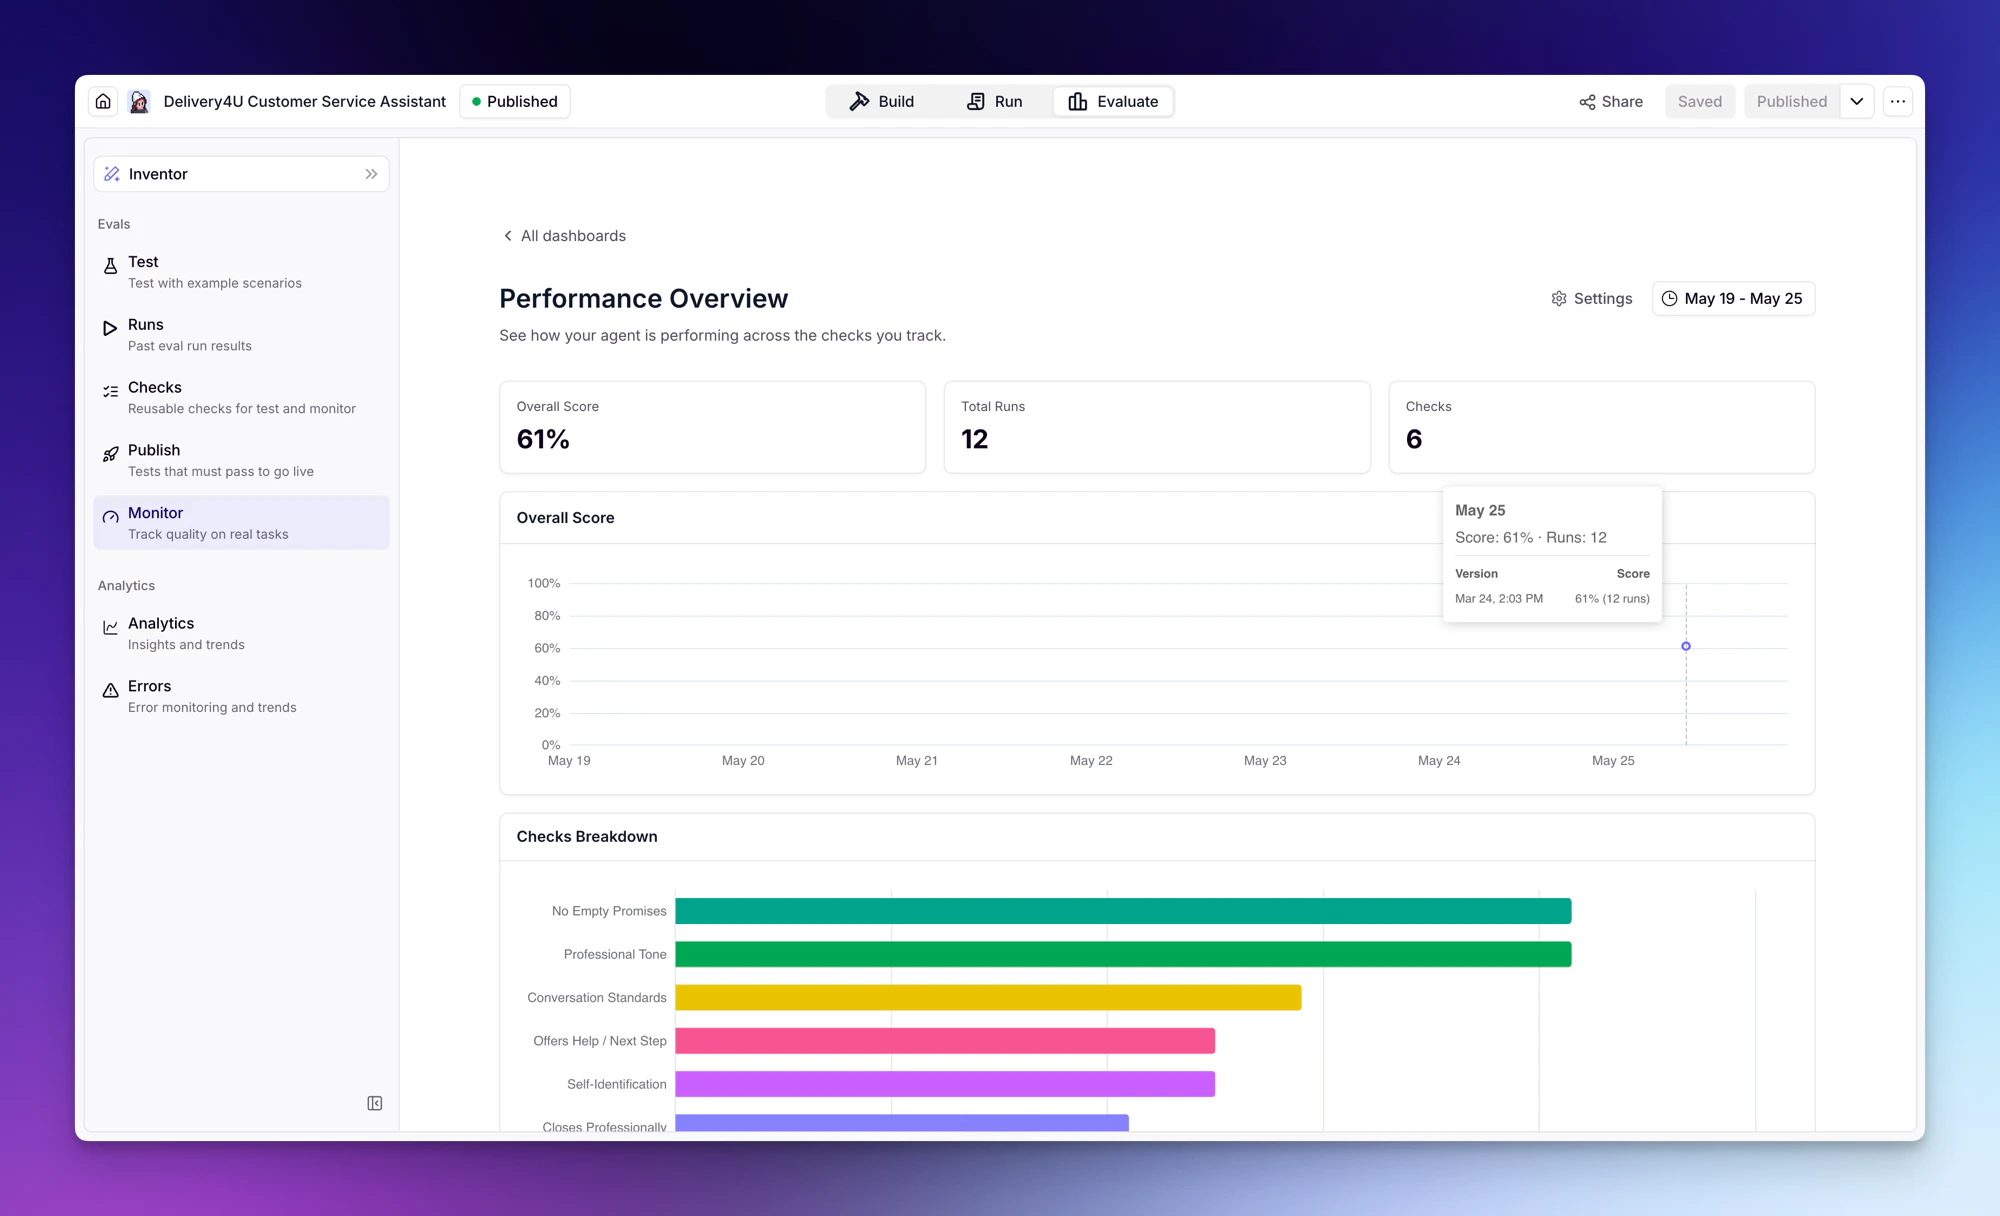
- Monitor — Track live Agent quality on real tasks. Create one or more Monitor dashboards, attach Checks, set a sample rate, and watch scores trend over time.
Understanding Checks
Checks are the reusable evaluation criteria that score Agent conversations. You create a Check once in the Checks tab and then attach it wherever you need it:- To a scenario in a test set — the Check runs every time that scenario is evaluated.
- To a Monitor dashboard — the Check runs on a sampled portion of live Agent tasks.
- To a one-off evaluation of already-completed tasks selected from the Agent’s task list.
Check types
When creating a Check, you choose one of the following types:LLM Judge
LLM Judge
Uses an LLM to evaluate conversations against a prompt you define.
| Field | Description |
|---|---|
| Evaluation Prompt | Describe the criteria for passing |
| Judge model | Select which model evaluates the conversation |
| Truncate long conversations | When enabled, conversations that exceed the judge model’s context window are trimmed from the oldest messages first, and the eval runs on the remaining portion. When disabled, oversized conversations fail with an error instead. Note that trimming removes early context, which can affect score accuracy if your evaluation criteria depend on the beginning of the conversation. |
Text Includes
Text Includes
Checks whether the Agent’s response includes specific text.
| Field | Description |
|---|---|
| Required text | The text that must appear in the response |
Text Equals
Text Equals
Checks whether the Agent’s response exactly matches an expected value.
| Field | Description |
|---|---|
| Expected value | The exact message the Agent should have sent |
Tool Usage
Tool Usage
Checks whether a specific tool was used during the conversation.
| Field | Description |
|---|---|
| Tool | Select the tool to check for |
| Position | Whether the tool was used anywhere, used first, or used last |
| Comparison | Check if the tool was used at least, exactly, or at most X times |
- Go to the Evaluate tab and select Checks from the left sidebar.
- Click + New Check.
- Select a Type (LLM Judge, Text Includes, Text Equals, or Tool Usage).
- Enter a Name for the Check (e.g., “Professional tone”).
- Configure the type-specific settings (see table above).
- Click Create Check.
Checks attached to a scenario are always included when you run that scenario. Additional Checks from the Checks tab are not auto-included — select the ones you want under Additional global checks in the run modal (Run Test Set, Run Scenario, or Evaluate Selected Tasks) before kicking off the run.
Creating a test set with a scenario
- Open your Agent in the builder and click the Evaluate tab. Select Test from the left sidebar.
- Click the + New test set button. Enter a name for your test set and click Create.
- Click on the test set you just created to open it.
- Click the + Add scenario button to add a scenario to your test set.
-
Fill in the scenario details:
Field Description Example Scenario name A descriptive name for this scenario ”Response empathy” Scenario description Describe a persona and situation — the AI generates realistic messages from this ”You are an impatient customer who wants quick answers about their bill.” Run X times How many times to execute this scenario 3 Up to X messages Maximum conversation length, where each message is one back-and-forth between the simulated user and the Agent 10 + Set exact first message Optional — pin the simulated user’s opening message instead of letting the AI generate it ”Hi, I need help with my bill.” -
Attach Checks to define how this scenario is scored. You can either pick existing Checks from the Checks tab or create new ones inline:
Newly created Checks land in the Checks tab and can be reused on other scenarios or Monitor dashboards.
Field Description Example Type The Check type LLM Judge Name Name of the evaluation criterion ”Empathy shown” Type-specific config Settings based on the chosen type (see Check types) Evaluation Prompt: “Did the Agent acknowledge the customer’s frustration and express empathy before offering solutions?” -
(Optional) Add Tool simulations to emulate Tool usage without actually calling the underlying Tools. Tool simulations are configured per scenario:
- Select a Tool to simulate.
- Provide a prompt describing what the Tool should return (a fake response is generated based on your prompt).
- In the Advanced dropdown, you can select a Simulation model to control which model generates the simulated response.
- Click Save test scenario to save your configuration.
Managing scenarios
Scenarios can be reorganized across test sets as your testing strategy evolves. Each scenario has a dropdown menu (the three-dot icon next to the scenario name) with three operations:| Operation | What it does | When to use it |
|---|---|---|
| Move | Relocates the scenario to another test set | Reorganizing test sets or consolidating related scenarios |
| Copy | Creates a duplicate of the scenario in another test set | Reusing a scenario as a baseline in a different test set |
| Duplicate | Creates a copy of the scenario in the same test set | Quickly creating a variation of an existing scenario |
Example scenarios
Here are some example scenarios you might create:Customer support - empathy test
Customer support - empathy test
Scenario name: Response empathyDescription: You are a long-time customer who was recently charged twice for the same order. You’ve already contacted support once without resolution and are feeling frustrated but willing to give the Agent a chance to help. Express your concerns clearly and see if the Agent acknowledges your situation before jumping to solutions.Up to: 10 messagesCheck: Empathy shown (LLM Judge)
- Evaluation Prompt: Did the Agent acknowledge the customer’s frustration and express empathy before offering solutions? The response should show understanding of the emotional state and validate their concerns.
Sales - product knowledge test
Sales - product knowledge test
Scenario name: Product expertiseDescription: You are a procurement manager at a mid-sized company evaluating solutions for your team. You need specific details about enterprise pricing tiers, integration capabilities with existing tools like Salesforce and HubSpot, and data security certifications. Ask clarifying questions and compare features against competitors you’re also considering.Up to: 15 messagesCheck: Accurate information (LLM Judge)
- Evaluation Prompt: Did the Agent provide accurate product information without making claims that cannot be verified? Responses should be factual, reference actual product capabilities, and acknowledge when information needs to be confirmed by a sales representative.
Support - escalation handling
Support - escalation handling
Scenario name: Escalation requestDescription: You are a paying customer who has experienced a service outage affecting your business operations. You’ve already troubleshooted with the knowledge base articles and need to speak with a senior support engineer or account manager. Be firm but professional in your request, and provide context about the business impact.Up to: 5 messagesCheck: Appropriate escalation (LLM Judge)
- Evaluation Prompt: Did the Agent acknowledge the severity of the situation, validate the customer’s need for escalation, and initiate a handoff to a human representative while maintaining a professional and empathetic tone throughout?
Running evaluations
You can run an entire test set or an individual scenario from within a test set by clicking the Run button on either. You can select specific scenarios within a test set to run a subset at once, or run all scenarios in the test set together. Note that you cannot bulk-select and run multiple test sets at the same time.- Enter a name for the run (e.g., “Scenario run - Jan 14, 12:14 PM”). A default name with timestamp is provided.
- Checks already attached to the scenarios are always included. To add Checks from the Checks tab, select the ones you want under Additional global checks.
- Click Run to begin. The simulator generates conversations with your Agent based on your scenario prompts and the selected Checks score each conversation.
Understanding results
After running an evaluation, you’ll see a detailed results screen:Run summary
The top of the results page shows key metrics:| Metric | Description |
|---|---|
| Average Score | Overall pass rate across all scenarios and Checks |
| Tasks | How many Agent tasks were evaluated |
| Agent Version | The version of the Agent that was tested |
Scenario results
Each scenario displays:| Column | Description |
|---|---|
| Status | Running, Completed, or Failed |
| Name | The scenario name |
| Score | Percentage of Checks that passed (shown with progress bar) |
| Checks | Pass/fail count (e.g., “1/1 passed”) |
| Credits | Credits consumed for this scenario |
Viewing conversation details
Click View Conversation on any scenario to see:- The full conversation between the simulated user and your Agent.
- Check verdicts from every Check included in the run, with detailed explanations of why each Check passed or failed.
Pass: The Agent demonstrated strong empathy throughout the conversation. Key examples include: acknowledging the customer’s frustration with being transferred multiple times (“I completely understand how upsetting it must be to feel like you’re not getting the help you need”), validating her experience with the double charge (“I truly understand how frustrating it is to be charged twice”), and directly addressing her skepticism by saying “I completely understand your concerns, especially given your previous experience.”
Monitor
The Monitor section continuously scores live Agent tasks against Checks from the Checks tab. Unlike Test, which runs simulated conversations, Monitor evaluates the real conversations your Agent is having. Monitor is organized into dashboards — you can create more than one (for example, one focused on tone, another on tool-use accuracy) and configure each independently.Creating a Monitor dashboard
- Go to the Evaluate tab and select Monitor from the left sidebar.
- Click + New dashboard and give it a name.
- Attach one or more Checks from the Checks tab.
- Set a Sample rate — the percentage of incoming tasks to evaluate.
- (Optional) Set a Conversation status filter to only evaluate tasks with specific statuses (e.g., completed, escalated). Leave blank to evaluate all tasks.
- Save the dashboard.
Viewing dashboard insights
Each Monitor dashboard shows:| Metric | Description |
|---|---|
| Overall score | Aggregate score across all evaluated tasks in the selected date range |
| Total runs | Number of tasks evaluated |
| Checks | Which Checks are attached to the dashboard |
- Overall score timeseries to spot regressions or improvements over time.
- Per-Check charts so you can see which criteria are slipping.
- Version markers that line up score changes with Agent publishes.
- A list of evaluation runs with score, name, and a drill-in to the full conversation.
Publish
The Publish section lets you choose which test sets must pass before your Agent can be published. If the results don’t meet your minimum pass rate, publishing can be blocked. You can configure Publish from the Publish section in the Evaluate tab.Test sets to run
Select which test sets to run before publishing. Click Add test sets to choose them — all scenarios in the selected test sets will be evaluated.Publish settings
Configure how evaluations affect the publish process:| Setting | Description |
|---|---|
| Minimum pass rate (%) | The minimum score percentage required for the evaluation to pass (e.g., 100%) |
| Allow publishing even if eval fails | When unchecked (the default), the Agent will only be published if the evaluation score meets or exceeds the minimum pass rate. When checked, the Agent publishes regardless of whether the evaluation passes. |
Best practices
Start simple
Begin with a few core scenarios that test your Agent’s primary use cases. Add complexity as you learn what matters most.
Be specific with Checks
Write detailed Check prompts. Vague criteria lead to inconsistent scoring. Include specific examples of what passing looks like.
Test edge cases
Create scenarios for difficult situations: angry customers, off-topic requests, requests to bypass rules, etc.
Run Monitor on live tasks
Stand up a Monitor dashboard with your most important Checks so you catch regressions on real conversations, not just simulated ones.
Keep your Checks tab tidy
Use the Unused filter to clean up Checks that aren’t attached anywhere. Group related scenarios into dedicated test sets and reorganize with Move, Copy, and Duplicate as your strategy evolves.
Sample wisely in Monitor
Match the sample rate to your task volume. A low-traffic Agent can run at 100%; high-volume Agents can sample lower to keep credit spend in check without losing the signal.
Frequently asked questions (FAQs)
How many scenarios can I have in a test set?
How many scenarios can I have in a test set?
You can add as many scenarios as needed to a single test set. Each scenario is evaluated independently and can have its own attached Checks.
How many Checks can I add to a scenario?
How many Checks can I add to a scenario?
Each scenario supports up to 10 Checks. This applies to scenario-level Checks defined within the scenario itself. Checks added via Additional global checks at run time are counted separately.
How are credits calculated for evaluations?
How are credits calculated for evaluations?
Credits consumed for each scenario are calculated by adding together:
- The Agent task run (the conversation with your Agent)
- The simulator (the persona/user simulation) — uses an LLM to simulate the user persona
- Every Check that runs on the conversation — each Check (especially LLM Judge) uses an LLM call
Can I rerun a previous evaluation?
Can I rerun a previous evaluation?
Yes, you can run the same scenarios again at any time. Each run is saved in your Runs history, allowing you to compare results across different Agent versions.
Where do my Checks live?
Where do my Checks live?
All Checks live in the Checks tab under Evaluate. From there you can attach them to scenarios (for evaluation runs), to Monitor dashboards (for live tasks), or to one-off evaluations of completed tasks. The Scenarios, Dashboard, and Unused filters show where each Check is currently attached.
Can the LLM Judge evaluate long conversations?
Can the LLM Judge evaluate long conversations?
Yes, with configuration. The LLM Judge Check includes a Truncate long conversations toggle in the Advanced section when creating a Check. When enabled, conversations that exceed the judge model’s context window are trimmed and evaluated. When disabled, those conversations fail with an error rather than producing a partial result.
What happens when a conversation is truncated?
What happens when a conversation is truncated?
The oldest messages are removed from the start of the conversation until it fits within the judge model’s context window. The judge is notified that truncation occurred and evaluates the remaining portion. If your evaluation criteria depend on early context — such as the user’s original request or instructions given at the start of the conversation — the result may be less accurate. In those cases, disabling truncation and selecting a model with a larger context window is preferable.
Can I move scenarios between test sets?
Can I move scenarios between test sets?
Yes. Each scenario has a dropdown menu (three-dot icon) with three options: Move relocates the scenario to another test set, Copy creates a duplicate in another test set, and Duplicate creates a copy in the same test set.
I don't see the Evals section. How do I get access?
I don't see the Evals section. How do I get access?
Evals is rolling out progressively, starting with Enterprise customers. If you don’t see the Evaluate tab in the Agent builder, reach out to your account manager to discuss access.